Picture this: You’re scrolling through drool-worthy fudge recipes at midnight, imagining that creamy, smooth bite. You get inspired, pull out the sugar, cocoa, and pot. Whiskers, my fluffy tabby, swoops in to oversee your ambition—she's hoping for a lick of something, even if it’s just the leftovers. But an hour later, you’re staring down a pan of sugar rocks, or maybe a sticky goo that won’t set, questioning every life choice. Fudge looks simple, but oh boy, it’s a magician when it comes to chaos.
The Chemistry of Fudge—Why So Complicated?
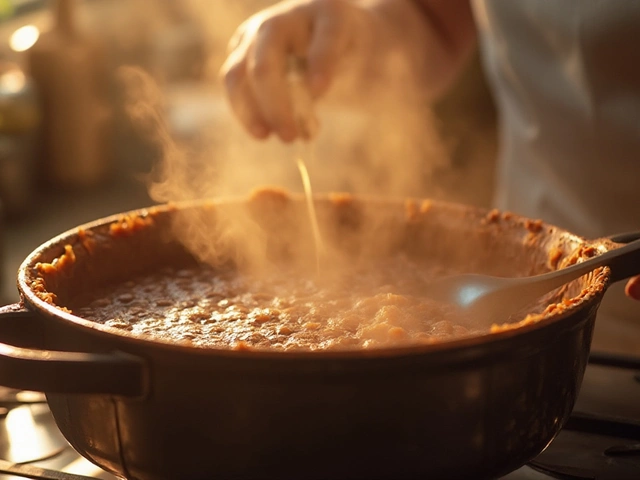
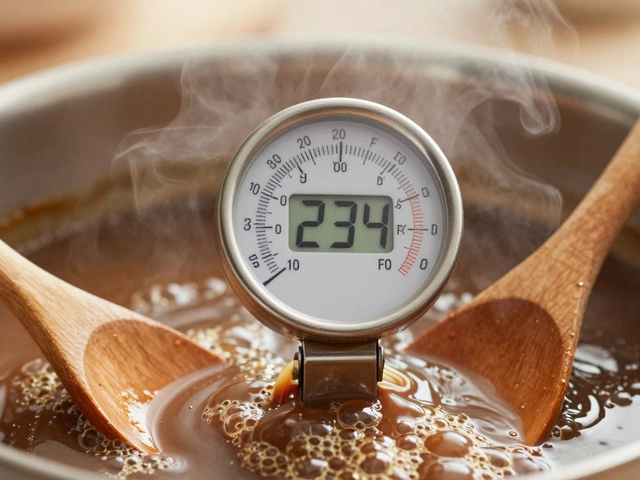
Let’s get this out of the way: fudge isn’t just melted chocolate with some sugar thrown in. The magic starts with sugar chemistry. Sugar, when heated, crystallizes... but not all crystals are created equal. You need millions of microscopic crystals—so tiny, your tongue can’t feel them—for that classic melt-in-your-mouth texture. If the crystals are too big, your fudge will feel gritty. If they’re too small, well, at least you’re doing something right, but that’s tough to nail. The moment your mixture hits 234-238°F (the so-called "soft-ball stage"), the window to perfection slams shut fast. Go under, and it won’t set; go over, and it’ll crumble or get dry. And here’s the kicker: the thermometer can be off by a couple of degrees depending on your elevation or even if you didn’t calibrate it this year.
Stirring is another minefield. Stir too soon and whoops—you’ve just triggered sugar crystals to flock together, making everything grainy. Don’t stir long or hard enough and your batch stays a half-baked syrup. And don’t even get started on accidentally splashing sugar up the sides of the pot, which can seed lush new crystals that ruin the vibe. Plus, humidity messes with the sugar concentration, so that rainy day bake can sabotage even a pro’s best efforts.
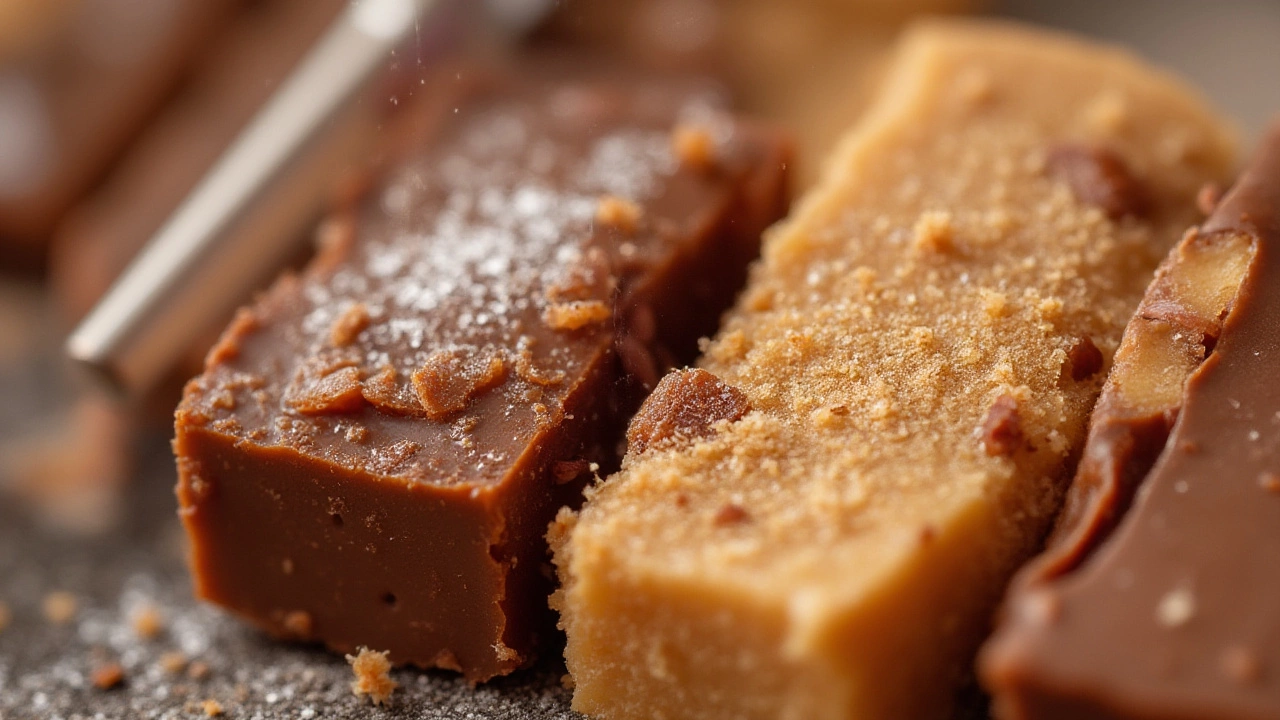
Let’s not forget what’s going on with the rest of your fudge mix. If you’re using real chocolate, you’ve got cocoa butter and maybe milk solids, and they react differently from plain sugar and cream. These ingredients all have unique melting points and interact with water in the pan, throwing in even more variables. Ever wonder why Grandma always beat her fudge by hand for ten minutes? It was an effort to keep the sugar crystals minuscule—and to sneak in an arm workout. Succeed at all that, and you get that shiny, breakable slab. Miss a step and it’s ice cream topping.
Why Your Fudge Went Wrong—and How To Rescue It (Sometimes)
If you’re tallying up fudge fails, you’re definitely not alone. One of the top mistakes is rushing the temperature. Let me say it louder: a candy thermometer is your most important fudge tool. A few years back, America’s Test Kitchen tried baking fudge without one—every batch set up differently, and none hit that classic firm-smooth note. Use a reliable thermometer, and if you suspect yours is off, test it in boiling water (it should read 212°F unless you’re at high altitude).
Another biggie is agitation, aka stirring. Pour the big, boiling pot into a new bowl before beating to control crystal growth, and don’t scrape any crystallized bits from the pan into your pour—they’ll ruin everything. Wait until it cools to 110°F before beating, or the crystals will form too quickly. If you see sugar crusted on the sides, brush down the pot with a wet pastry brush as it cooks to prevent ‘seeding’ big lumps. Skip this, and your fudge turns sandy, not silky.
Speaking of humidity, it’s not an old wives’ tale—sugar grabs moisture right out of the air, so fudge literally won’t set properly on humid days. (Pro tip: Only make fudge when it’s dry outside if you want predictable results.)
Sometimes all feels lost. If your fudge is too soft, scoop it back into the pan and cook it a tad longer to drive off more water, then beat again. If it’s grainy, you can melt it down with a splash of water or cream, bring it back to the right temperature, and try for a second chance. Don’t toss the pan just yet—think of these as “advanced practice rounds.”
Little-Known Secrets for Fudge Perfection
Here’s where things get fun. Serious fudge makers swear by a few tricks that sound almost superstitious—like using only wooden spoons, or chilling the bowl you plan to beat the candy in. There’s some truth here: wood doesn’t transfer heat as quickly, so it gives you a tiny edge to control crystal formation. Others use a tablespoon of corn syrup or a dab of marshmallow cream to ‘invert’ some of the sugar, which stops big crystals from snowballing together. If you’ve ever made fantasy fudge (the kind with marshmallows), you’ve seen this in action—way easier, but a little less “classic.”
People will tell you fudge is just ingredients and science, but it’s a sensory game too. Listen to your fudge. Really. The way the bubbles slow down around 234°F, or the smell shifts just before it’s done—these little signals are gold once you’ve ruined enough pans to notice them. Pan choice matters, too. Heavy-bottom pans heat slower and more evenly. Any hot spots? Sugar will burn, even at the edges, which then spreads bitterness through your entire batch. I’ve learned the hard way that my cat’s “whisker test” (i.e., her staring judgmentally from the counter) is the only non-scientific part you can add to the process.
Fancy a shortcut? There’s microwave fudge (with condensed milk), but it skips all the chemistry, so you won’t get quite the same glossy snap or melt-in-the-mouth feel. The classic stovetop method gives real fudge its unique texture, depth, and bragging rights. Once you nail it, you’ll start tweaking ratios and experimenting: a spoonful of espresso, a pinch of flaky salt, toasted pecans, a swirl of peanut butter—fudge loves you if you respect its rules.
Fudge-Making Tips from Decades of Kitchen Trials
Years of kitchen disasters (and triumphs) add up to some hard-earned wisdom. Here are the real-life tips the recipe cards don’t tell you:
- fudge absolutely needs precision: Always use a well-calibrated thermometer, don’t guess by eye or “old school” spoon tests until you’re truly experienced.
- Measure everything in advance. Fudge moves fast at critical points—there’s no time to hunt for butter while your syrup cools past prime crystal territory.
- Cook on low and slow, stirring only enough to moisten the sugar until it dissolves. Then, put down the spoon until it’s ready for beating.
- Use heavy pans for even heat. Thin pans scorch sugar, which is unforgiving and ruins texture and taste.
- Work quickly but gently when pouring and beating—fudge is like a moody cat: it doesn’t appreciate being neglected or rushed.
- Let fudge set at room temperature, not in the fridge. Rapid cooling causes sugar to crystallize unevenly and brings on the dreaded graininess.
- For add-ins, always wait until fudge is partly set up. Nuts or fruits dropped in too soon will either sink or create wet pockets that mess with texture.
- Wash down the sides of the pot with a wet brush as it cooks. Sugary streaks are the enemy of smooth fudge.
- If you get called away during cooling, cover the bowl with a clean towel to keep humidity out and preserve your fudge’s dreams of glory.
- And finally, don’t double the batch until you’ve nailed a single. Too much volume in the pan throws off cooling speed and stirs up trouble.
So next time you’re tempted by those gorgeous Pinterest photos, know that fudge is part art, part science, and a fair portion luck of the draw. But every candy-maker has burned a pan or spooned out a gritty failure—those moments are just part of the journey to creamy perfection. If nothing else, your cat will appreciate the scented chaos. And when you crack into a perfect slab, it will taste all the sweeter for the effort.
Popular Posts


Should You Store Macarons in the Fridge?
Feb, 20 2025